In the first part of this series, I describe why and how we do micro frontends at HolidayCheck. One of the key aspects I described was the focus on speed. Our goal was that our first micro frontend, the header, doesn’t slow down the pages on which it is embedded. In this second article I will describe what we have done & learned along the way. The things described are not specific to micro frontends but can be applied in a variety of web apps, however our first micro frontend is the first project where we had such a strong focus on speed.
Performance Budgets
Before we started planning the technical setup, we sat together and defined performance budgets for the header. You can see a performance budget as inverse speed limits for you application, so it defines the maximum amount of slowness you are willing to accept. Performance budgets can either focus on the input like the maximum amount of JavaScript you want to deliver or the outcome like First Contentful Paint (FCP) or Time To Interactive (TTI). We decided to use input metrics, since they are much easier to measure and influence by a micro frontend.
We have defined the following budget:
- Javascript: max. 32 kB minified (~10kb to 15kb gzipped)
- CSS: max. 15 kB minified
- HTML: max 10 kB
- Server Side Rendering: P95 must be below 10ms
We didn’t do any scientific approach to get these numbers. We simply estimated based on our experience how much code would be at least necessary while still having a stretch goal. These budgets are worth nothing if we wouldn’t measure them and alert ourselves when we exceed them. To measure the size of the JavaScript bundles we build, we use the webpack max asset size feature. You can add this to your webpack build with just a few lines of configuration:
{
  performance: {
    hints: 'error', // Fail the build when asset size is exceeded
    maxEntrypointSize: 32768,
    assetFilter: function(assetFilename) {
      return assetFilename.endsWith('.js');
    },
  }
}
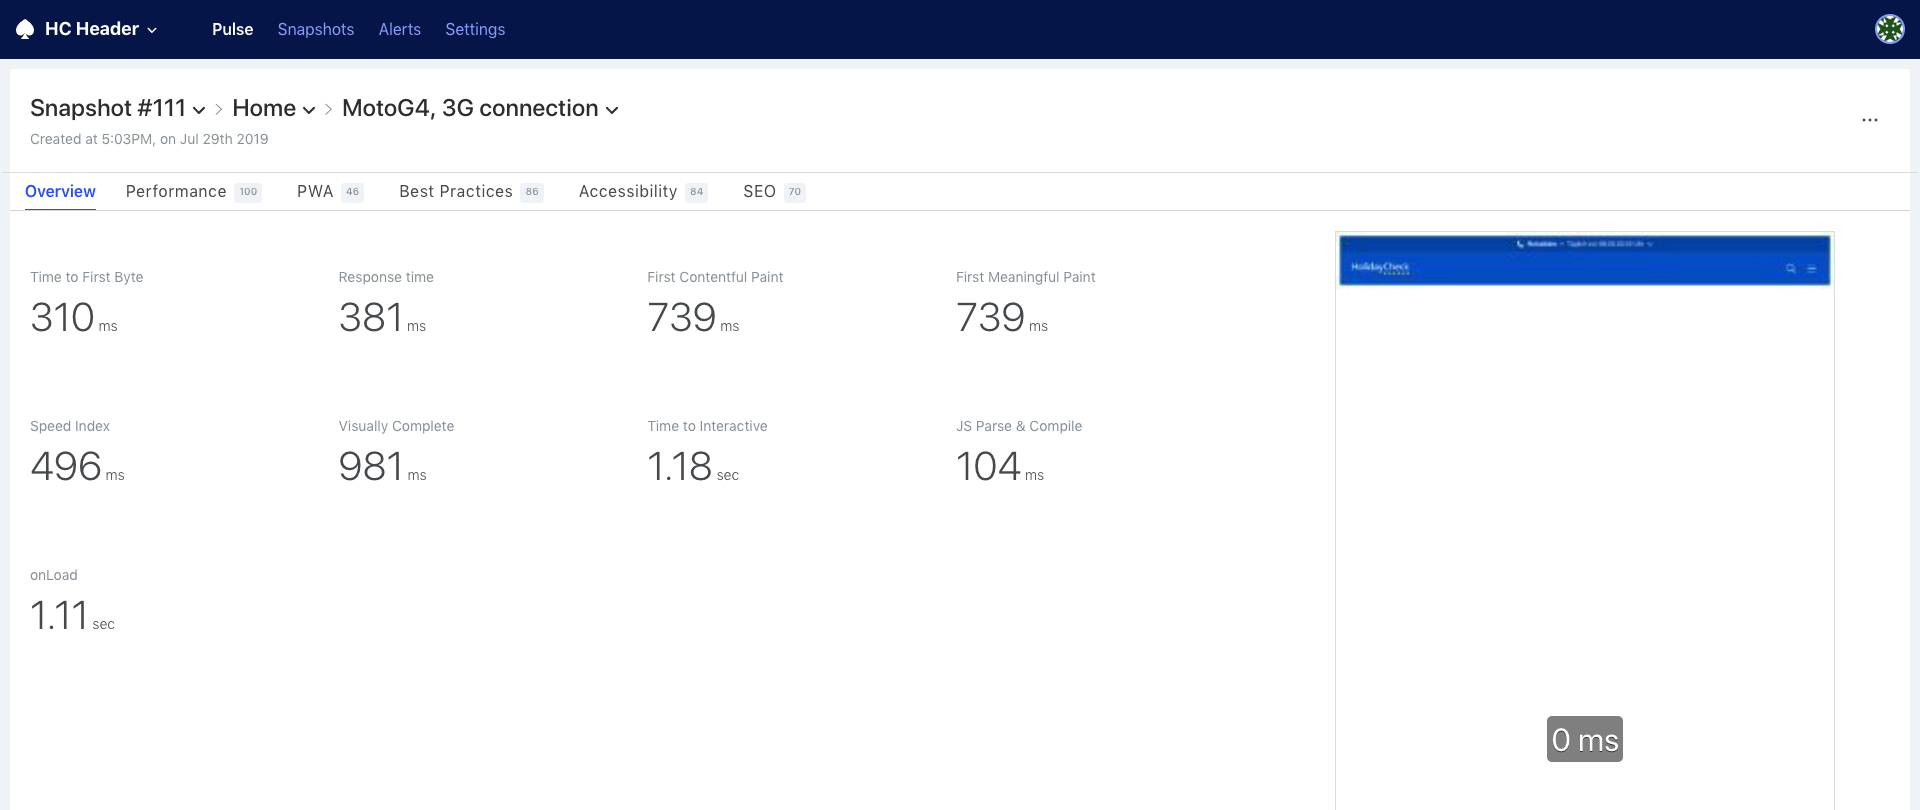
Additionally we measure the size of the JS, CSS and HTML with Calibre. Calibre is a service which lets you define a schedule for Google Lighthouse and displays the results over time. Calibre also has performance budgets built in, so you can define the limits and get alerted in different ways when a budget is exceeded. Our Calibre setup, for example, alerts into a dedicated Slack channel. The team behind Calibre is super responsive and motivated when we need help, report bugs or suggest features, I strongly recommend everyone to try their service.
Analysing
For deeper analysis we use Google Lighthouse together with the various capabilities of the Chrome Dev Tools. Explaining the Chrome Dev Tools would exceed the scope of the article. I recommend everyone to get familiar with the Dev Tools. When it comes to speed especially the Network, Performance and Audits tabs are relevant.
Bundle Size
In today’s JS ecosystem it is quite a challenge to build an App with a modern component based approach within 32 kB. Considering React + React-Dom have already 110 kB minified.
That’s why we decided to use Preact + Unistore, which together are roughly 10 kB minified. Preact has the same API as React with a similar feature set (besides synthetic events), but is a lot smaller. Unistore is the complementary tiny state management solution.
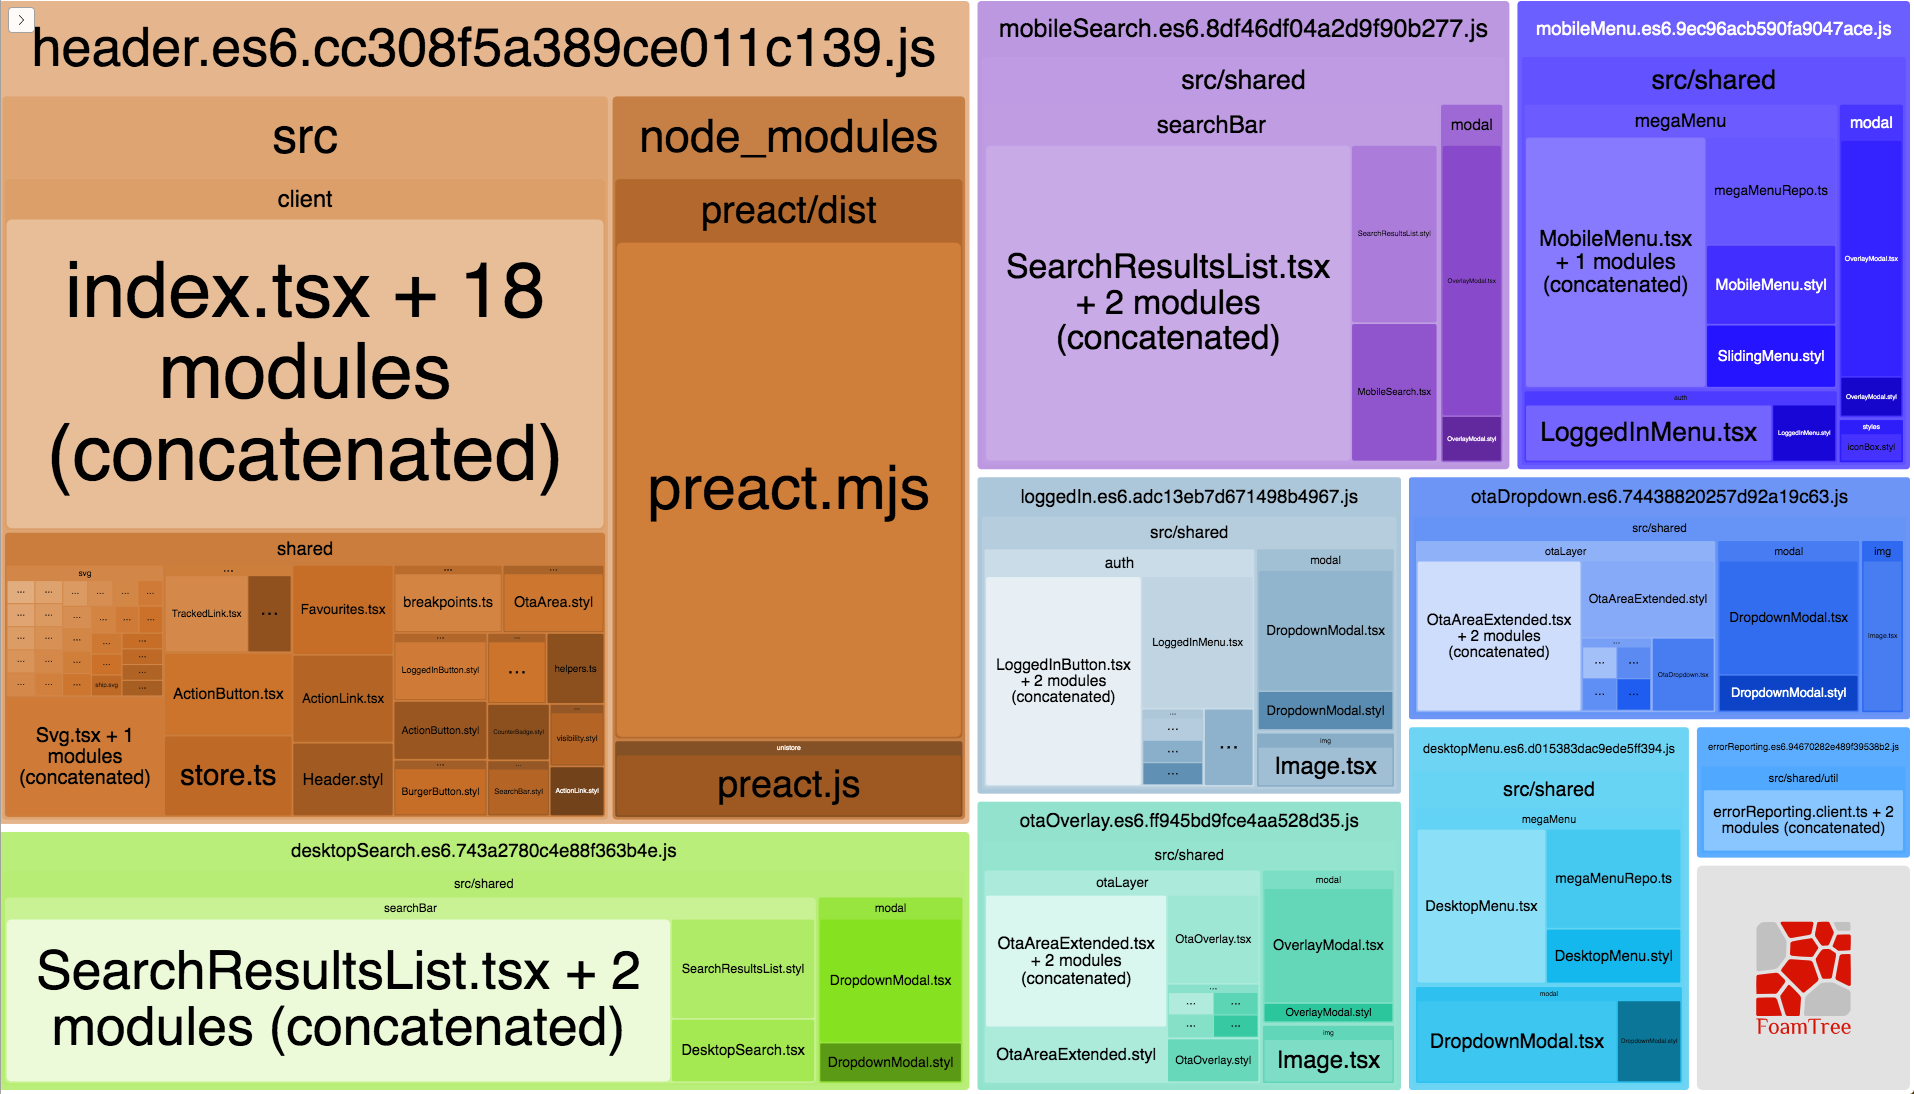
It still happened regularly that we hit the 32kB for our main bundle and our CI pipeline gently reminded us with a red build. To debug what takes up the budget the Webpack Bundle Analyzer plugin is really great. It generates an interactive tree map which let’s you easily find the big chunks.
Bundle Splitting
Once we found the problematic parts we needed to find a solution. Bundle splitting was the one thing with the highest impact.
On the first impression we shall deliver only the Javascript which is absolutely necessary for the current view. Everything else can be loaded asynchronously on demand. Possible split points are things which are needed after an interaction, like opening the menu or rendering of search results. Also parts of the code which are needed just by portion of our users, like features which are only available once you are logged in, are a great possibility to add a split point.
Adding a split point when using webpack is quite simple by using the import keyword.
import(/* webpackChunkName: "desktopMenu" */ './DesktopMenu').then(menu => {
  console.log("Menu loaded", menu)
});
The import keyword will return a promise which completes with whatever the loaded module exports. The
effect of this is that webpack will separate all code of the DesktopMenu including its dependencies into
a separate JS bundle which is loaded only once the import is triggered. To simplify and reduce
boilerplate for this, React offers the lazy function.
ECMAScript modules
To support older browsers like IE 11, you have to transpile your code to ES5. However the transpiled code is usually bigger and has worse runtime performance, compared to using the native ES6 features. Almost all modern browsers already support ES6 and therefore it would be great to have a possibility to deliver the transpiled ES5 code only to browser which do not understand ES6.
Luckily this is possible with ECMAScript modules in the browser. By adding a script tag with the
type module, browsers which support modules will download & execute the referenced Javascript. Old browsers
simply ignore those scripts. Additionally we create a script tag with the property nomodule and reference
the ES5 version of our code. The browser which do understand ES modules (and therefore ES6) ignore those, the ones
who do not will use them.
<script type="module" src="bundle.es6.js" async defer></script>
<script noModule src="bundle.es5.js" async defer></script>
This means you have to build your application twice, once with an ES5 and once with an ES6 target.
CSS
Keeping an eye on how much CSS is delivered is also important. The following things were relevant for us.
- Remove unused CSS
- Inline “critical” CSS (CSS which is necessary for the first impression)
- Load the rest asynchronously and not render blocking
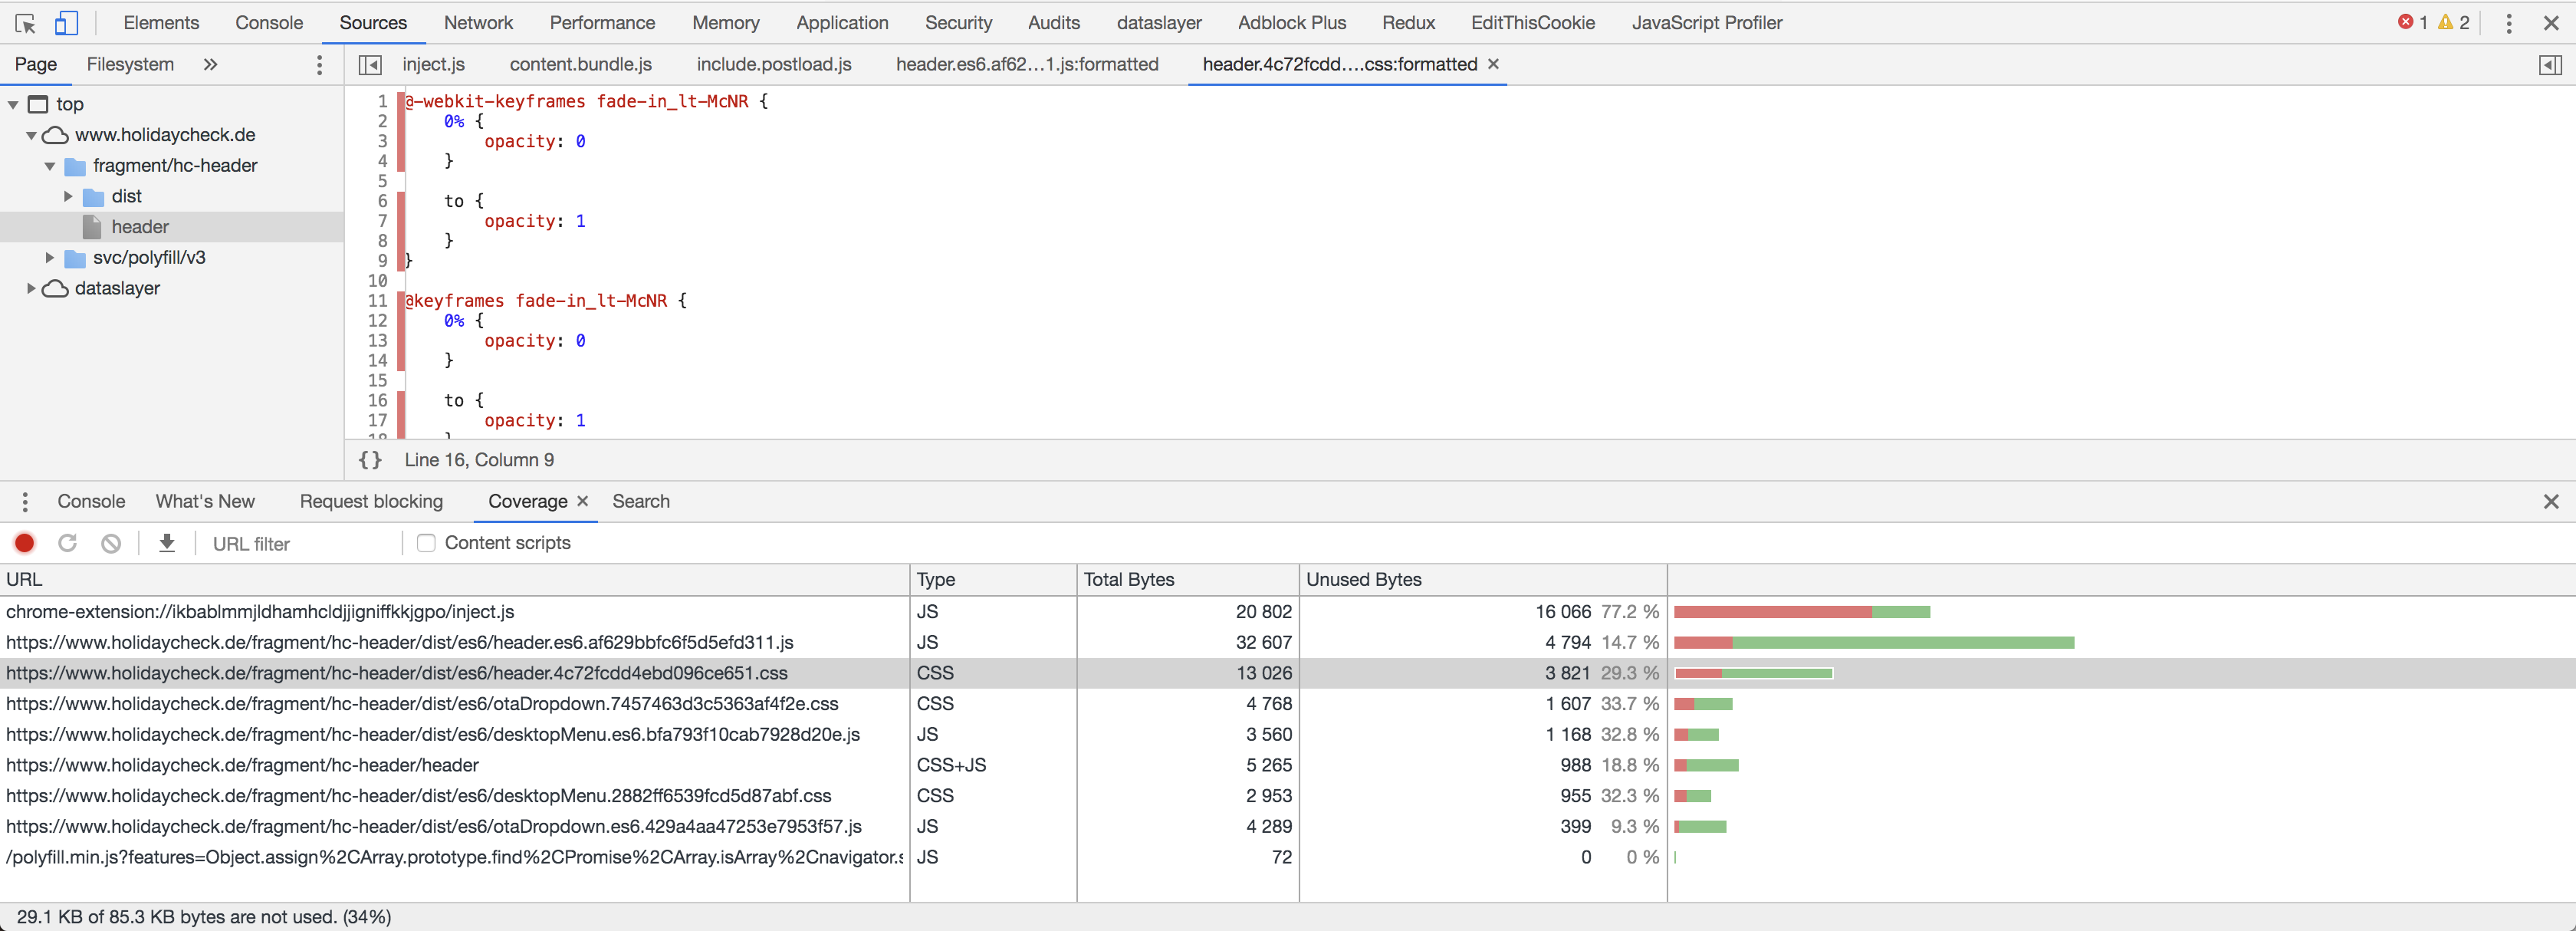
To identify unused and therefore obsolete CSS we use the Coverage report from Chrome Dev Tools, which is available in the Source tab. You can even click around on your page and the coverage updates in real time.
How to inline the critical CSS of your page depends a lot on your tool chain and the amount of automation you need
for it. But once you are able to do this, you can load the rest of the CSS asynchronously without blocking the rendering.
This is done with a preload link which we change to a stylesheet link once it is loaded, which triggers the browser
to apply the stylesheets.
<link rel="preload" type="text/css" href="bundle.css" as="style"  onload="this.onload=null;this.rel='stylesheet'">
<noscript><link rel="stylesheet" type="text/css" href="bundle.css"></noscript>
Keep in mind that this only works for browsers that support preload links. For all others you need a polyfill, we use the one from loadCSS.
Server Side Rendering
For a faster First Contentful Paint and First Meaningful Paint we decided to do SSR (Server Side Rendering). For most frameworks, for example React and Preact, it is quite simple to setup SSR, just check the docs of the framework you use.
When a doing SSR the browser can already render the page, even when the necessary Javascript is not loaded, parsed & executed yet. (also our SEO Team is very happy when we do SSR) Still SSR also has a drawback, by transferring the page prerendered more content is sent to the Browser. So while SSR improves the paint metrics, it might have a negative impact on other speed metrics.
Do not overdo
In today’s JS ecosystem it is quite a challenge to get speed right, however with performance budgets and some discipline to follow them it is possible to get a fast result. We often had to critically ask ourselves whether we prioritize developer experience or user experience (speed) higher. However I recommend to not overdo it, delaying a feature for weeks just for the sake of some milli-seconds is often not sustainable. It is important to compromise at some point, but these compromises should be explicit decision and not something which happens accidentally.
🏎 Thanks for reading and stay fast ❤️!
I am not yet sure what to write about in the 3rd part of this series, if there is anything you are interested in please ping me on Twitter.